
The new “Pattern Recorder” on the Kontrol S4 MK3 isn’t an exclusive feature. Any MIDI controller can be used to build those same sequenced sample loops in Traktor! In this article, DJTT contributor Teo Tormo shares how in a step by step guide using the Midi Fighter 64.
Previously, I described how to perfectly map the Traktor Step Sequencer to any controller. That mapping process isn’t too difficult once you get up to speed on how the sequencer and its specific modifiers work, but it can take time and patience.
Enter Traktor’s Pattern Recorder
A few months ago, Native Instruments released the Traktor Kontrol S4 MK3. This controller has a new way of using the Remix Decks called “Pattern Recorder”. Basically, records and loops any samples you trigger, and you can continue to layer or delete individual samples in that loop. It’s a powerful way to make use of the Remix Decks.
Many people (myself included) thought this was an exclusive feature of the new S4 MK3. But after a lot of thinking, I realized that it wasn’t unique to the S4 MK3 – it simply was a very sophisticated and creative way to control the pre-existing Step Sequencer.
In this article, I’ll explain how to replicate the Pattern Recorder control of Traktor’s step sequencer with any other controller. I’m using the epic Midi Fighter 64 as an example. If you have this controller, I’ve posted a mapping in DJ Techtools mapping repository. This mapping is designed for the C and D Traktor decks and placed into the Bank 2, leaving Bank 1 free to map any controls for playback, mixing, FX, etc.
Before explaining how to map the pattern recorder, here’s a simple video I recorded using the mapping. It does a great job showing off the differences between using the pattern recorder and the “classic” way of using the step sequencer:
[embedded content]
To start this mapping, you’ll want to open Traktor’s preferences, go to Controller Manager and create a new mapping.
Then, create 2 modifiers. Those modifiers will serve as the “record switch” and the “delete switch”. Neither function exists in Traktor, so you’ll have to define how to use them. In the example mapping, I mapped the two modifiers to two buttons of the MF64 as Modifier 7 (which will be the “delete switch”) and Modifier 8 (the “record switch”).
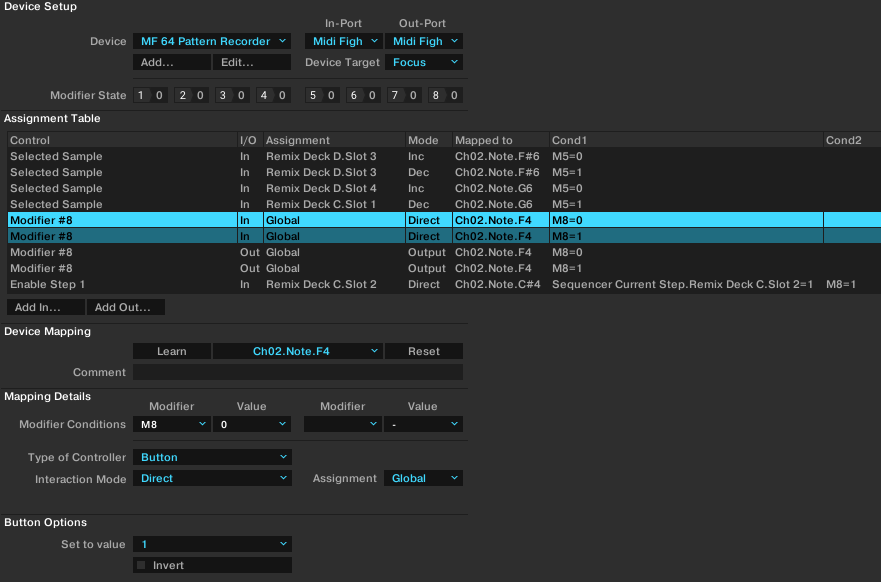
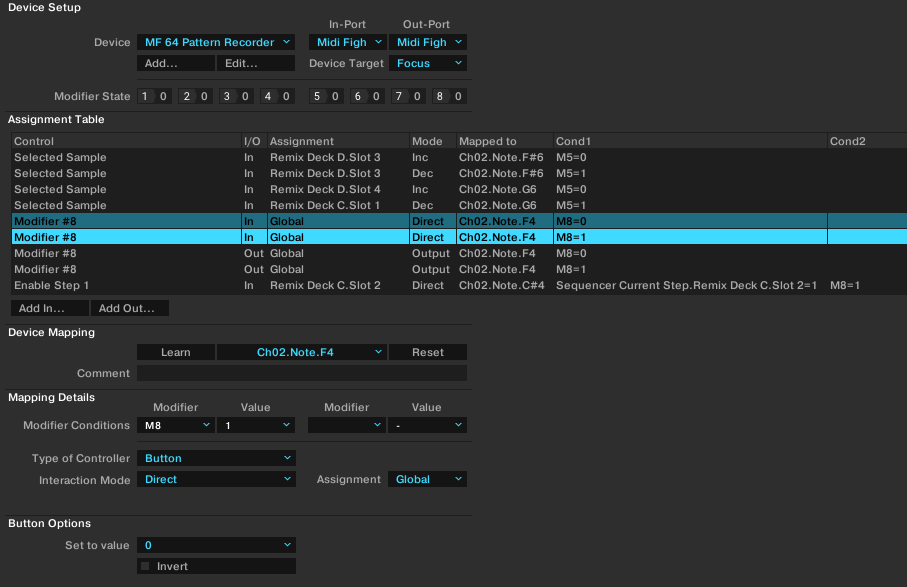
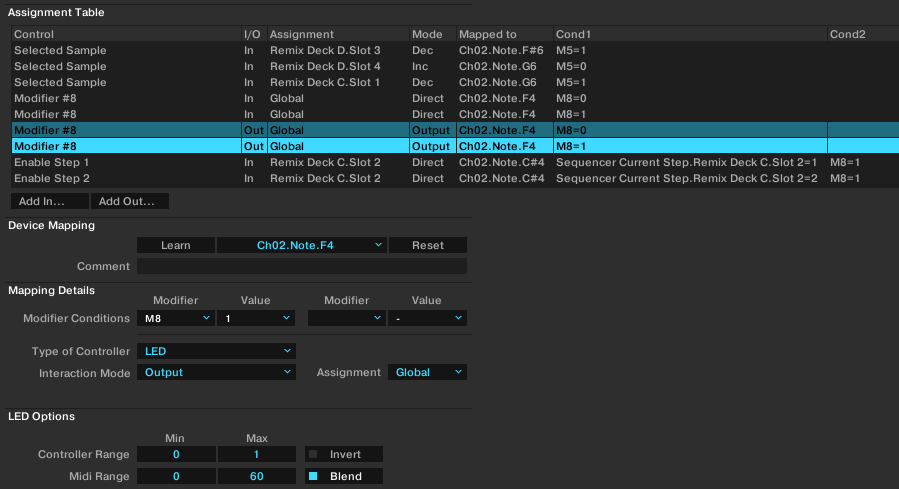
Modifier 8 acts as a “switch” that changes from enabled to disabled every time you press it, so you have to create two assignments for it. The first assignment changes the modifier’s value to 1 when it already has the value 0. The second makes the modifier change to a value of 0 when it has a value of 1. It’s a little confusing, but see the screenshots below for clarity:
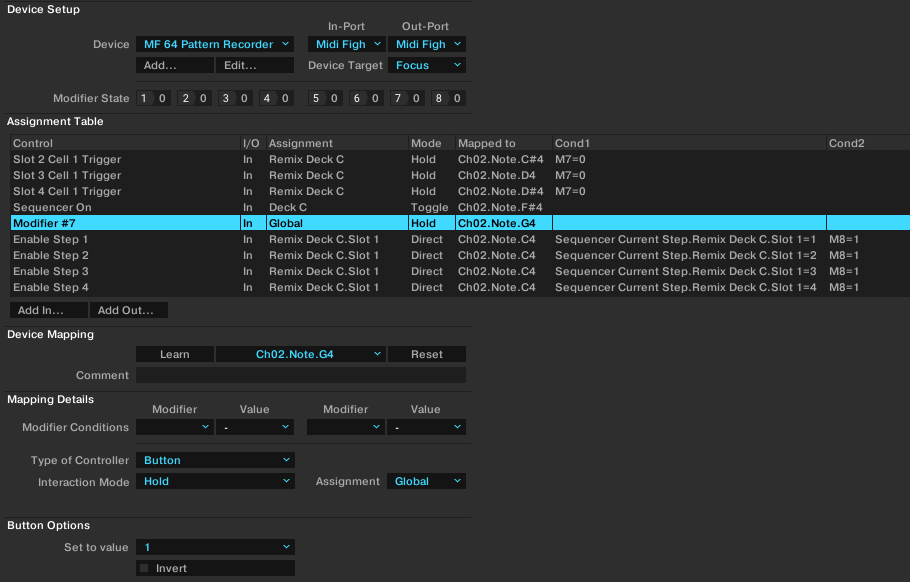
Modifier 7 acts as a switch that only changes its value when it’s pressed. When deleting a recorded sound, you hold the delete switch and press the pad that triggers that sound. This means you only need one assignment for that modifier, setting “Interaction Mode” as “Hold” and “Set to Value” to 1:
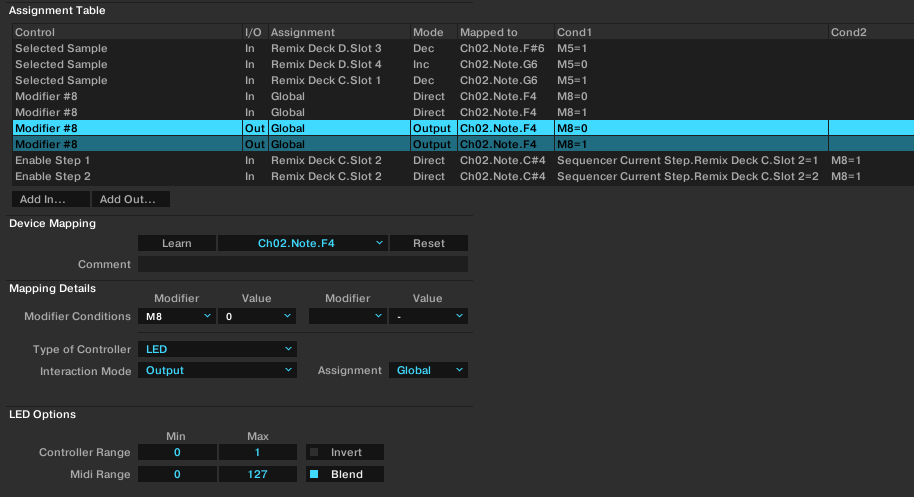
I also set two assignments for the lighting of Modifier 8 in the MF64, so the record button lights up when recording a pattern is enabled:
You will also need to assign a button for the “Sequencer On” function, or the sequencer won’t work. But that is easy to map and needs no further explanation:
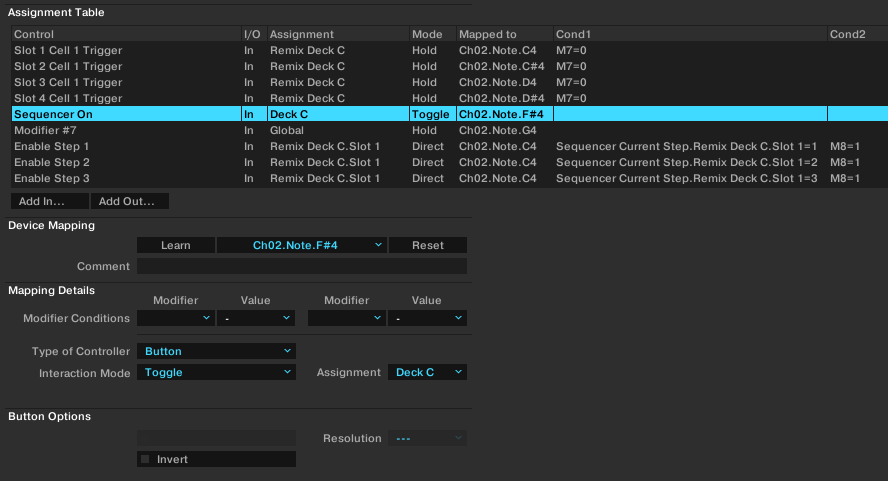
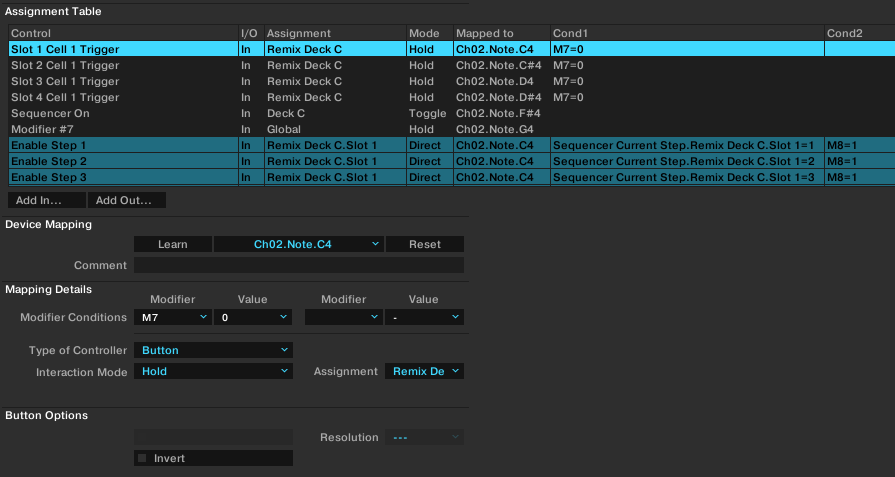
Now you have to assign buttons for playing sounds (not recording), so take four buttons in your controller and create assignments: “Slot 1 Cell 1 Trigger”, “Slot 2 Cell 1 Trigger”, “Slot 3 Cell 1 Trigger” and “Slot 4 Cell 1 Trigger”, and map them to your selected buttons. Be sure to assign them to the same Remix Deck and set interaction to “Hold”.
You have to also set Modifier 7 and Value 0 as conditions. If you didn’t, when you try to delete a sound from a pattern, it would also trigger a sound:
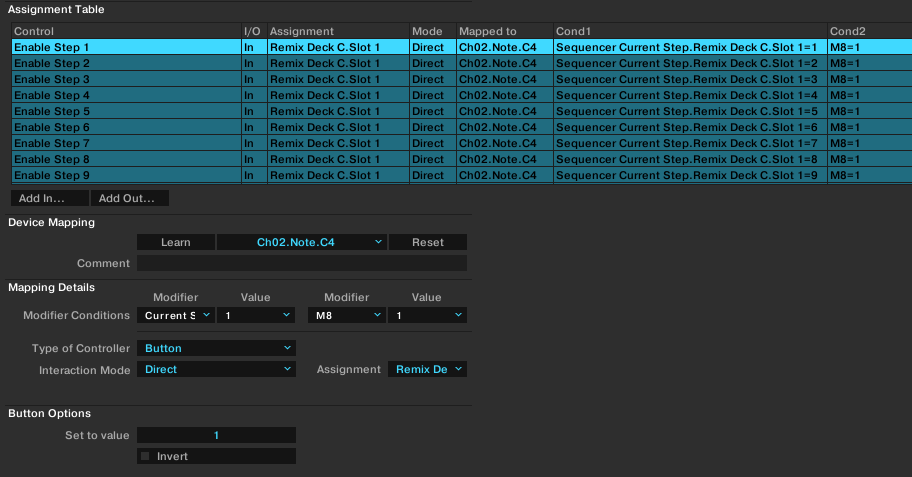
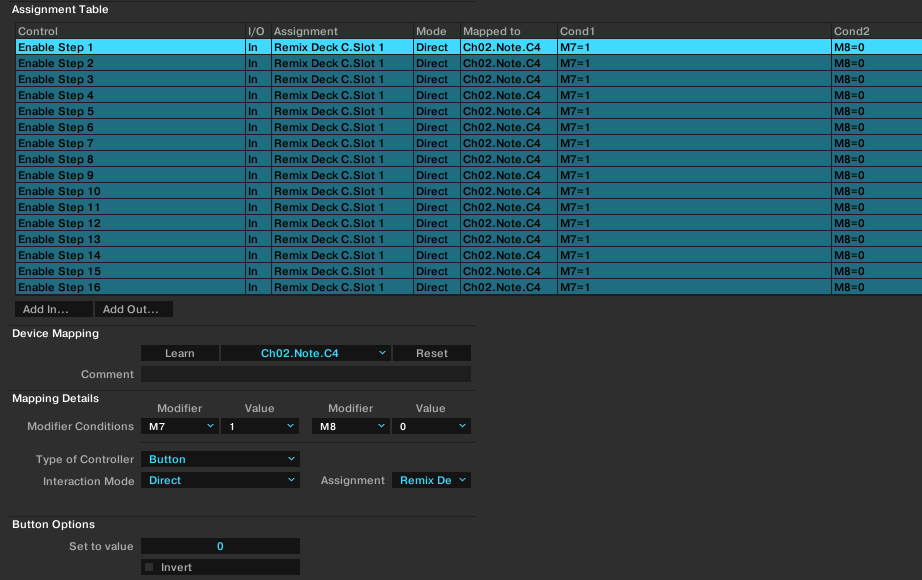
Now starts the boring part – creating 16 assignments for recording every trigger at every step. So create “Enable Step 1”, “Enable Step 2”, etc… up to “Enable Step 16” and assign every command to the same Remix Deck and the same slot, and map them to the same button that you mapped for “Slot 1 Cell 1 Trigger”.
The key with these assignments is setting two Modifier Conditions:
- The first one is using the internal modifier “Sequencer Current Step” and set the value to the same step that you are enabling.For example, “Enable Step 1” needs the value of 1 in the “Sequencer Current Step” modifier. “Enable Step 2” needs a value of “2”, and so on all the way up to 16. This will make your mapping work like the Kontrol S4 MK3 pattern recorder, because it makes the step sequencer work as a real-time recorder.
- The second condition is that Modifier 8 needs a value of 1. This value means that the record switch is enabled. Remember to set the Interaction Mode to Direct and Set to Value on 1 – that means that it will enable the step. Check the screenshot:
Now repeat the last step, creating 16 “Enable Step…” assignments for every slot. At the end, you´ll have 64 assignments, 16 for every slot.
Next, create the assignments for deleting every slot, so create 16 more “Enable Step…” assignments for each slot. This time the Modifier Conditions are different:
- Modifier 7 has to be 1 – because the “delete switch” has to be pressed
- Modifier 8 has to be 0, because recording must be disabled
- “Set to Value” must be on 0, that means disable the step. See the screenshot:
You can now record and delete for each slot. Keep going for bonus functionality!
It wouldn’t be a complete mapping if you couldn’t change the samples you are sequencing, right?
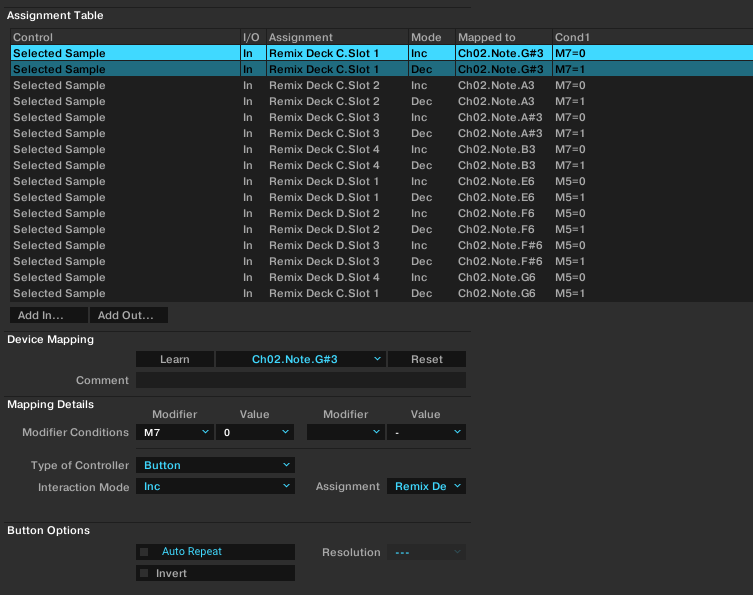
Select four more buttons on your controller and create two assignments for each button with the control as “Selected Sample”.
One of the assignments will be for moving down in the Remix Deck Slot (set “Interaction Mode” to “Inc”) and the other one for going up (“Interaction Mode” to “Dec”). I used the “delete switch” as a modifier for this, so when not pressed these buttons will go down the list, and when it is pressed, it will go up:
Adding Lighting
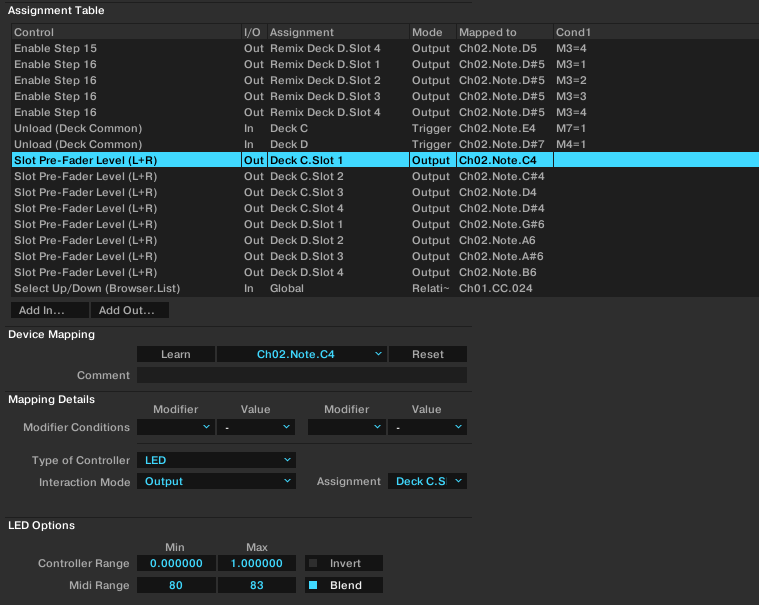
Finally, let’s put lights in the trigger buttons. The goal is when a sample sounds, the button will light up. For this I used “Slot Pre-Fader Level” and assigned it to the same buttons that trigger the sounds. The MF64 can be a bit tricky for setting colors, so for simplicity I just used a short range from 80 to 83 that fires up only some similar colors. Again, check the picture for clarification:
And that’s all!
More About The MF64 Mapping
In the example mapping for the MF64 (I called it “The Sequencer”), everything is mapped in Bank 2.
- The three top rows of buttons are assigned to the controls of the pattern recorder – left four columns are for deck C, and right four columns are for deck D.
- The bottom five rows are assigned to the “classic” way of using the step sequencer as explained in a previous article.
- This allows for dual control similar to what you might have on an Ableton Push – making patterns with the pattern recorder and then modifying those patterns with the step sequencer buttons.
Hope you enjoyed the tutorial – if you have questions, I will try to answer in the comments!
Author: DJ TechTools