
What’s the best hardware to use with Rekordbox FX? A lot of the functionality of the Rekordbox DJ software is locked away. In this article, DJTT contributor Teo Tormo shares how he has unlocked some of the power features of Rekordbox DJ’s effects, and even made it possible to control the effects with an RMX-1000 in MIDI mode. Keep reading for the details!
The Limitations of Rekordbox DJ’s FX
Rekordbox comes with an integrated MIDI mapping tool. It’s pretty easy to use, but also very limited.
When it comes to the FX, some functions are not available to be mapped -like the “Slide FX” feature (only available if a DDJ-XP1 controller is connected).
Other functions can only be mapped in an impractical way. For instance, for FX selection, you can only map one button (not a encoder or potentiometer) to move upwards in the FX list, and you can’t directly select an effect and turn it on at the same time (something that’s possible in Traktor and Virtual DJ).
You can’t also set min and max values for CC data or note velocity, and there is a problem with many functions: you must map them to a button that with every push has to send two messages for executing an action (a note on and a note off) Otherwise, you have to push twice the button every time you want to turn on or off a function controlled with that button.
All that means the only FX controls that feel comfortable to use are the ones integrated in the Pioneer DJ controllers and mixers. In a previous article we showed you how to trick Rekordbox DJ and use the jogwheels of any MIDI controller (jogwheels are another feature that can’t be mapped by the user), so I thought there must be some way to make FX control mappings more comfortable and easier to use.
I found the best solution by looking into the native mappings of the Pioneer DJ.
Ironically, one of the best FX workflows on the market is the RMX-1000 from Pioneer DJ, but although they have made almost all their hardware compatible with Rekordbox, and there’s an expansion pack with the same effects from the RMX-1000, and the RMX-1000 sends MIDI with every control on it… the RMX-1000 can’t be used for FX control or sampler control with Rekordbox DJ.

So I put together what I’ve found and made a mapping for the RMX-1000 with some commands that are not available in the Rekordbox mapping utility and also used some magic and message patching from the Bome MIDI Translator Pro app. The result can be seen in this video:
If you have an RMX-1000 and want to use it in the same way, you can download from the DJ Techtools mapping repository a package with:
- the Rekordbox mapping
- the MIDI Translator Pro project file
- a sample pack with the same sounds that come with the RMX-1000
- 2 more drum kits with 909 and 808 sounds (well, the sounds were sampled from a TR-08 and a TR-09).
How To Use The Mapping + Project
To use the package, prepare your RMX-1000:
- Update the unit to the latest firmware (v2.20). Previous firmware versions make the RMX-1000 behave different sending MIDI.
- Set your RMX-1000 in “plugin” mode for MIDI data sending. To do that turn on the unit while pressing the Quantize button and you will enter in a “settings” mode. Once there, using the +/- buttons select “btn” in the screen, push TAP, and with +/- select “PLG”, and press TAP again to confirm.
- Make sure you are using channel 1 for MIDI data. In the “settings” mode select “CH”, press TAP, and after selecting 1 push TAP again to confirm. Turn off the RMX-1000 and the next time you turn it on the changes will take effect.
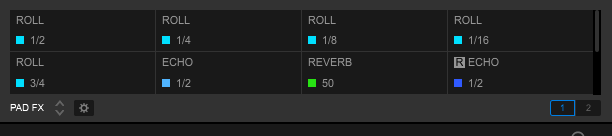
- The pads of the RMX-1000 are linked to the PAD-FX of Deck 1, so define there your favorite FX combinations. If you want something similar to the hardware, define there different Roll FX variations.
- You only have to connect the RMX-1000 to your computer using a USB cable, as the unit is going to be used as a controller you don’t need to connect any audio cable.
- You will need to own the RMX expansion pack for Rekordbox, the mapping is made to work with that effects, which are the same that come with the hardware unit. Otherwise the mapping will work but the FXs that you will control will be different from the ones in the RMX-1000.
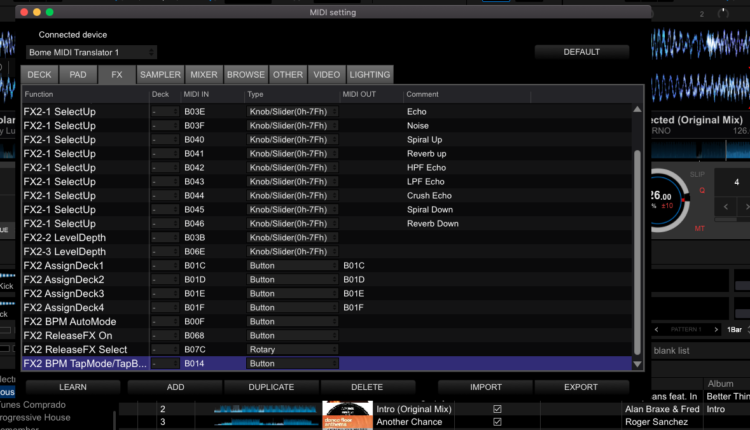
Now open MIDI Translator Pro (if you don’t have it you can buy it for €59, about $67), load the .bmtp file. Open Rekordbox, go to the MIDI utility window (click on the MIDI button on the upper right) and select the Bome MIDI Translator Pro 1 virtual port in the MIDI devices drop-down menu. Import the .csv file included in the package. Additionally you can also load to the sampler the included .wav files if you want the original sample sounds and some cool 808 and 909 sounds.
If you watch the video or you’re trying the mapping, you’ll see that you can directly select and turn on a concrete FX using the buttons on the right side of the RMX-1000, and if you select a different FX with the previous turned on, the new FX will remain on.
You can also control the Release FX with the switch of the hardware unit (although Rekordbox only allows to use an encoder for that). You will find a visual PDF guide inside the package explaining how the mapping works.
The main difference with how the RMX-1000 works is in the isolator controls, which in the mapping are set to control FX because there is no isolator in Rekordbox. The right side controls and the sampler controls work almost the same way. The buttons Roll, +/-, Hold and Overdub have no assigned controls in Rekordbox. The mapping is not perfect, the pads from the RMX-1000, more exactly the three central pads, which are mapped to the first five Pad FX controls of Deck 1, don’t work with much precission. I think the bug is in the rules I defined in the MIDI Translator project for that control, which acts like a fader and must be “shared” with 5 different software controls. Feel free to try to fix that and upload your variation!
How Can I Make My Own Mapping Like This?
The RMX-1000 “controller conversion” I’ve made is a sophisticated and very complex way of using some hidden mapping commands. It also is assisted heavily by MIDI Translator.
The most useful thing about this article for many readers might not be the package above, but rather the concept behind it. You can make use of the same hidden mapping commands with any controller. Here’s how:
CSV files and the structure of a mapped command
Rekordbox uses .csv files for storing the MIDI mappings, which is a file format tipically used for spreadsheets. The information of the mapped commands is stored in lines of code with the following structure:
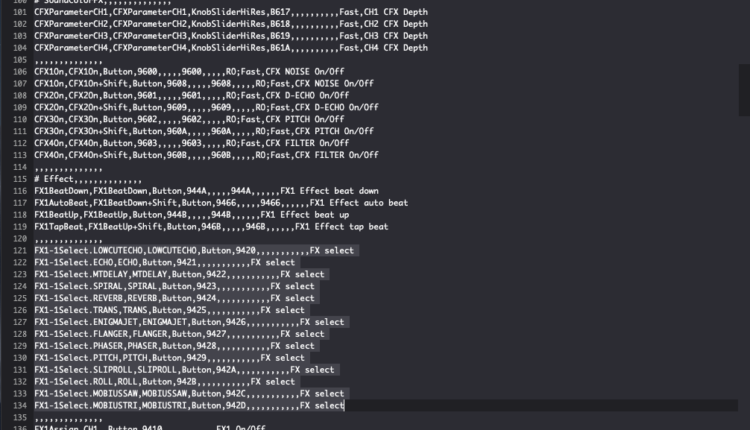
Sync,Sync,Button,9058,0,1,2,3,9058,0,1,2,3,Blink=600,Sync On/Off
This is the definition of the Sync function mapped to a button in a DDJ-1000 controller. Every needed data is separated by commas and always follows the same order. There must be always 14 commas, and you can put the info between them, but there is no need to fill every space between commas as some data is not required or necessary with all the mappable functions. The data must be set the following way:
- In the first two spaces between commas you have write the name of the command and the function which controls. With many commands it’s the same word, or you can even write nothing in the second space.
- The third space is for setting the type of control you are going to use. “Button”, “Rotary”, “KnobSlider”, “KnobSliderHiRes” is the usual info you’ll see here.
- The following space is for writing down the MIDI command in hex format. This is the input command.
- The following 4 spaces are for setting the MIDI channels for the MIDI command, but you only have to write something here if it’s a command that needs different MIDI channels for each deck. Remember one thing: MIDI channels are expressed substracting -1 to the number you want to write, so if you want to set MIDI channel number 1, you have to write 0.
- The following space is for the output MIDI command, write only a command here if you want to control led lightning or some kind of indicator. As in the input command, the following four spaces are for setting the different MIDI channels for each deck just in case the command needs that.
- The following space is for options. You can set more than one option if you separate them using “;”. I only know how to use some options and I’ll explain them later in the article.
- The last space is just for commenting, you can write whatever you want here.
- If you look into a .csv Rekordbox mapping file you’ll see a lot of lines starting with a “#” symbol. That symbol indicates that the full line is a comment and has no effect on the mapping function.
For editing .csv files I recommend using Komodo Edit, it’s a cross platform text editor for dynamic programming languages, and it’s free.
The Secret MIDI Mapping Commands in Rekordbox
FX1-1Select.Down : Rekordbox only allows end users to map the command that let’s you move UP in the FX list, but this one let’s move down in the same list. Of course it can be used as FX2-1Select.Down for the FX bank 2.
FX1-1Select.FXNAME : This command allows direct selection of an FX writing down in capital letters the name of the FX after the dot, and eliminating spaces in the name of the FX. So if you want to select Enigma Jet in FX bank 2 you have to write FX2-1Select.ENIGMAJET .
FX1-1On.ECHO : Selects AND activates an FX, as the previous command you have to write the name of the FX after the dot in capital letters and w7ithout spaces. This command does not work for the RMX expansion FXs.
FX1-1Momentary : Enables the FX unit only while you are pushing the mapped button or pad.
FX1AssignSampler, FX1AssignMaster: Assigns the FX unit to the Master or Sampler, this of course can be used writing FX2 instead of FX1.
FX1Assign.MASTER, FX1Assign.MIC, FX1Assign.LEFT, FX1Assign.RIGHT: Work in a similar way as the previous commands (left and right are fort left and right assigned crossfader channels) but behave a bit different because those commands need to be mapped to a button that acts like a switch.
SFX1-1On, SFX1-1Select, SFX1-Touch, SFX1-Slider: Those commands are for the Slide FX that can be controlled with the DDJ-XP1. I have tried to use them with no luck, I think that Rekordbox looks for a real DDJ-XP1 to be connected. I’ve tried to trick the software using a virtual MIDI port with the same name than de DDJ-XP1 MIDI port but no luck again, I think that Rekordbox sends sysex data to the controller and waits for a response to know if there is a real XP1 connected.

The options of the commands
You can set some options at the penultimate space between commas, I have decoded some of those options. If you want to set more than one option you will need to separate them using “;” .
- RO: this option hides the command to be shown in the mapping utility. Some commands are hidden by default and this option is not needed.
- Min=x : changing the X with a number from 0 to 127 you set the minimum CC or velocity value that the command needs to be executed.
- Max=x : changing the X with a number from 0 to 127 you set the maximum CC or velocity value that the command will accept to be executed.
- Value=x : not sure about this one, some commands seem to accept this option for some led light indicators, but I’m completely sure of how to make us of it. Try to experiment.
- Blink=x: not sure again about this one, but it’s always used with led light commands. It sets the blink speed of an indicator, but I’m not sure about the values that are valid. You can also experiment with this one.
As I explained in the previous section, the FX1-1On.FXNAME command does not work with the RMX expansion pack effects, but there is a trick to make something similar. You can edit (manually from an editor, not with Rekordbox) in the FX1-1Select command the “Button” and write “KnobSlider”, and that command will let you use a knob or a fader to select the FX.
As Rekordbox lets you assign more than one command for the same function, using MIDI Translator you can generate different MIDI messages converting button messages into messages with different CC values to make a direct selection of the RMX effects.
Bome MIDI Translator as a helper
One of the problems I mentioned at the beginning of the article is that for many functions, Rekordbox needs to be mapped to a button that sends two different commands every time you want to activate or deactivate: a note on and a note off, or CC value of 127 followed by a CC value of 0.
Many MIDI controllers can send customized messages and that’s not a problem, but many others don’t. If your controller only sends one message with every button push, you can use MIDI Translator to generate two or more messages with every single message you send. You only have to generate four “translators” inside a project, two for the “note on” and two for the “note off”. The first of every pair of translators must send the same message, but the second one must send the inverse message (e.g. the note off).
In the following image you can see an example of this, it’s the “translators” I created for the Play Pattern function that was mapped to the X-Pad button of the RMX-1000:

MIDI Translator can also be used for more complex things using the “rules” section of every “translator”, as you can write simple scripts with global and temporary variables that allow you to create shift buttons, different layers of commands and functions that only trigger under certain conditions. It’s a very versatile tool, and a deeper explanation of variables will have to wait for another article because it’s way too complex.
Experiment By Yourself!
With all the commands detailed above, you can create complex FX mappings with Rekordbox. My advice is to start a mapping using the integrated mapping tool to set the “allowed” commands and after that export the .csv file and manually edit the file with Komodo to add some of the hidden commands or change some options.
Remember that after editing and saving the file, you have to re-import the .csv to Rekordbox to make the changes to take effect.
Of course you can look for more hidden mapping commands and share them with the community. First you can look inside the native Pioneer mappings, you will find them here:
- In macOS: go to the Rekordbox app, right click and select “Show package contents”, then open Contents/Resources. All the official mappings are there.
- In Windows 10: go to Program Files/Pioneer/Rekordbox 5.x.x and the .csv files are right there.
You will find more commands using an hex editor and looking inside the Rekordbox binary. Here’s how to do it in macOS (anyone know the best way on Windows?):
- Go to the Rekordbox app, right click and select “Show package contents”.
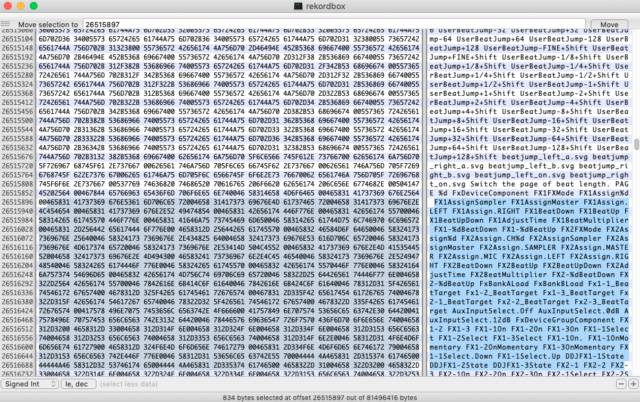
- Go to Contents/MacOs and you will find Rekordbox executable file. Open it with HexFiend.
- In HexFiend select Edit/Jump to Offset and write 26515897 (with Rekordbox version 5.5) and you will start to see some commands there.
Hope you can use all this as inspiration for making new creative and crazy FX mappings, or if you want you can also try to make a variation of the RMX-1000 mapping (it can be done much better). The final point is that your creativity never must be stopped by the limits some brands put in their products. In the end, we are the product buyers, and we have the right to use those products with freedom.
Author: DJ TechTools