
Does your DJ mixer or controller not have split cue? Do you want to mix entirely inside of your headphones? It can be a challenge to be headphones-only and not have a split cue functionality, but in today’s article, DJ Soo shares a DIY trick for making your own using a small external mixer.
DJing only in headphones?
DJing entirely in headphones is not a new phenomenon.While the traditional monitor setup with the headphone on one ear is still the most iconic form of monitoring, many DJs in the past and more and more DJs today seem to gravitate towards DJing entirely in headphones.Why? There’s a few great reasons:
- poor or non-existent monitors at venues
- the desire to protect hearing in loud club and festival environments using IEMs
- simply being able to practice at home without disturbing the family or neighbours
What is Split Cue and do DJs use it?
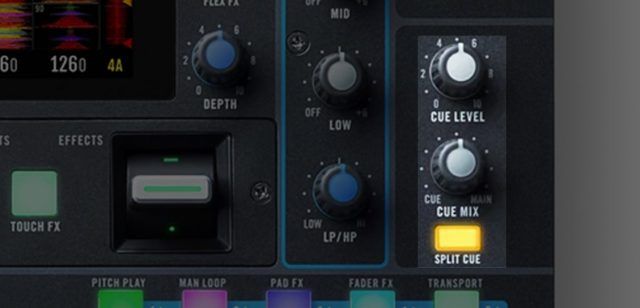 Split Cue on the Rane Seventy Two mixer
Split cue splits the headphone output into two signals:
- the cued track is heard in the left headphone cup
- the master output is heard in the right headphone cup.
In a sense, it mimics the traditional monitor/one cup setup entirely within the headphones. Many DJs that still like to beat match by ear prefer this method of headphone mixing over simply using a Cue/Main knob because it offers a true separation between the master output and the cued output – much like you would with a monitor and headphone setup.
While this feature is fairly common in higher-end mixers like DJM-900, Xone:96, and many Rane models, it’s not fully standard across all mixers. It is still pretty uncommon to find on controllers (some that have it include higher-end models like the Numark NS6II and NS7III, Denon controllers, the Roland DJ-707M, and the Mixars Primo).
In this article, I’ll detail how to jury rig a split cue functionality into a mixer or controller that does not offer the feature.
What You Need:
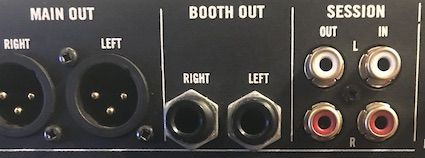
For this method to work, the mixer or controller must have at least one additional output. Often this is a booth output, but it can also be a second main out or an aux out. If your controller or mixer only has a single output available, this method will not work. You might be able to do it digitally if you’re using software with the ability to route the output to your laptop output without latency.
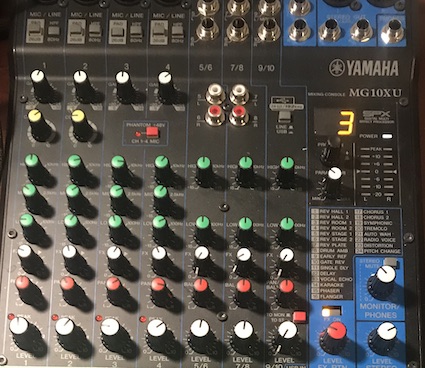
The other key ingredient is an additional line mixer, with a minimum of two stereo inputs that also include balance/pan controls. There are several options to choose from in a variety of price ranges:
- Under $60: The Behringer Xenyx 502, Mackie Mix5, or the Alto ZMX52 are all small size mixers with the required features.
- Something higher quality (~$150): the Soundcraft Notepad8FX or the Allen & Heath Zed-6 would also work
- Larger mixers may not be the most convenient option to haul to gigs, but for home use, they’re feasible.In my photos, I’m using a Yamaha MG10XU – which is a little on the large side, but was the only mixer I had available in the studio at the time.
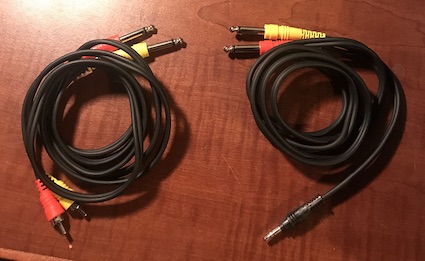
Finally, you’ll need some cables to connect the mixer/controller to the line mixer.Most line mixers (including the ones listed above) will have 1/4”/TRS inputs for the balance-controlled stereo inputs.We will be connecting the secondary output from the back of the mixer to the line mixer, as well as the headphone output. So depending on the output, we will most likely want an RCA or 1/4” to 1/4” stereo cable, and a Y-cable from the headphone jack (usually 1/4”, but sometimes 1/8”) to a stereo 1/4” cable.
Setting the DIY split cue up:
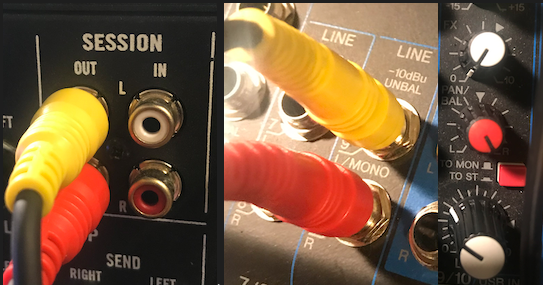
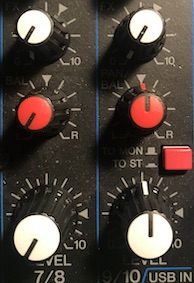
First, plug the secondary output from the mixer/controller into one of the sets of inputs on the line mixer.On that channel, turn the balance/pan knob all the way to the right.
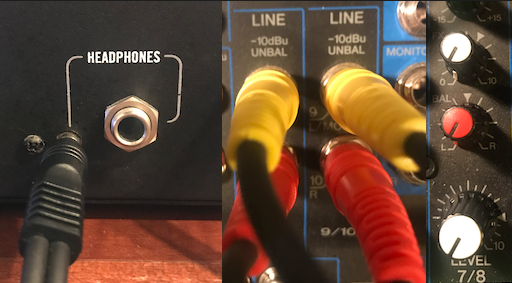
Next, plug the Y-cable from the headphone output on the mixer/controller into the second input on the line mixer.On that channel, turn the balance/pan knob all the way to the left.
Finally, plug your headphones into the headphone jack on the line mixer.
At this point, you’re good to go.The cued track will respond to your mixer’s cue system and send the signal to the left side of your headphones. The master output will be sent to the right side of your headphones.Simply dial in the levels so the signal isn’t peaking and you’re ready to start mixing.
How to use your DIY Split Cue:

In most mixers that have it built-in, split cue is activated by button or switch. A cue/master knob adjusts the balance between the two (all the way to Master = you’ll only hear the master in your right side; all the way to cue, = you’ll only hear the cued track on the left side).
Often when I use split cue, I will have the cued track going a little quieter when split and use that to cue and beatmatch the track. Once I get the mix dialed in and am ready to go live, I will disengage the split cue and run the headphones at full master so I can hear the actual mix in my headphones.
Because this mixer will not have a button/switch to disengage the split cue, a couple more steps just need to be done to switch from split cue to a full master signal.
When you’re ready to just hear the full master mix in the headphones, simply bring down the levels of the cued side (or hit the mute button if the mixer has one), and centre the balance/pan knob on the channel producing the master signal.Going back to split cue involves simply moving the balance/pan knob on the master channel back to the right and turning up or unmuting the cue channel.
That’s it! This is a simple, DIY way to implement split cue on just about any mixer or controller at minimal cost.
Author: DJ TechTools